home home Facebook twitter pinterest instagram goodreads email OPSEC recipes travel hawaii bucket list about erica Image Map

AdSense

Friday, July 31, 2015

Homemade Banana Pancakes


In order to switch things up every now and then, Mr. L and I like to have breakfast for dinner, or "brinner" as we affectionately call it a la Scrubs:


For this week, I decided to try my hand at some delicious homemade banana pancakes since I had some over-ripe bananas still on my counter.  I never really know what to do with over-ripe bananas besides banana bread, so this was a great recipe to use them up before they needed to be tossed out!

Thanks to this recipe from Allrecipes.com, Mr. L and I had some delicious pancakes for brinner.  And since that recipe made about 13-14 pancakes (I used 2 tbsp of batter per pancake), I was able to freeze the rest for a quick breakfast treat throughout the week.  I definitely recommend giving this recipe a shot if you're feeling like some banana pancakes for breakfast or brinner soon!  :)


adapted from AllRecipes.com

Ingredients [6-8 servings]
  • 1 cup all-purpose flour
  • 1 tbsp sugar
  • 2 tsp baking powder
  • 1/4 tsp salt
  • 1 egg, beaten
  • 1 cup milk
  • 2 tbsp vegetable oil
  • 2-3 ripe bananas, mashed
  • Additional vegetable oil for frying

Directions

Combine first four ingredients into one small mixing bowl.  In another medium-sized bowl, combine egg, milk, oil, and mashed bananas.

Add the dry ingredients to the wet ingredients, stirring carefully.  The batter should be a bit lumpy.

In a skillet over medium-high heat, add a small amount of oil.  When oil is very runny, add two tablespoons of batter for one pancake.

When the pancake batter starts to bubble around the edges and in the middle of the pancake, flip.  Cook for another minute or two until the second side is also golden brown and delicious.

Add more oil to the pan as needed, and as each pancake is finished, place on a paper towel to absorb any excess oil.  Feel free to spread some butter on top, then serve and enjoy!


Follow

Wednesday, July 29, 2015

Hawaii Volcanoes National Park Driving Tour: Devil's Throat


The Need to Knows:
  • Devil's Throat is located along Chain of Craters Road within Hawaii Volcanoes National Park in Pahoa, HI.  Its exact location can be found here:
  • There is no parking lot for Devil's Throat, but there is a small pullout on the right side of the road close to its location, about 1.3 miles from the Puhimau Crater parking lot.  If you zoom in on the embedded Google Map above, the pullout is where the car is parked on the right side of Chain of Craters Road.
  • There are NO barriers here to keep you from falling in the crater, so you MUST exercise caution and sound judgment when visiting Devil's Throat.  Pay close attention the trail to the crater and do NOT hang out on the crater's edge.  You don't want to fall in here and be maimed or killed!
  • I would estimate that you should spend about 15-20 minutes at this stop including the very short trail to the crater.
  • As always, for updated information on closures within the park, visit this NPS page.  Also keep in mind that any information in these posts is subject to change any time by the National Park Service!

Monday, July 27, 2015

Hawaii Volcanoes National Park Driving Tour: Puhimau Crater


The Need to Knows:
  • The Puhimau Crater is located along Chain of Craters Road within Hawaii Volcanoes National Park in Pahoa, HI.  Its exact location can be found here:
  • There are no restrooms or water fountains located here.
  • Since this stop is another pullout off of Chain of Craters Road like Lua Manu Crater (except with its own parking lot this time), I would say it is wheelchair and stroller-friendly.
  • I would expect to spend about 10-15 minutes here checking out the views of the crater.
  • As always, for updated information on closures within the park, visit this NPS page.  Also keep in mind that any information in these posts is subject to change any time by the National Park Service!

Friday, July 24, 2015

Grilled Pork Chops with Dale's Seasoning

When I was perusing my local grocery store's meat section looking for deals, I came across some nice-looking bone-in pork chops that were at a decent price.  I haven't made pork chops in a long time, so I decided to grab them and head back home to see what I could make out of them.  Thankfully I remembered this family favorite recipe that my mom has been making for years.  I've loved this recipe for such a long time that I figured it was only appropriate to make them for Mr. L and me this week!

My mom usually just marinates the pork chops in Dale's Original Steak Seasoning and calls it a day, but I like to add just a little something-something to kick it up a notch.  Garlic is always a household favorite, and Mr. L looooves freshly cracked black pepper.  So of course I had to add both to the pork chop party!

The chops turned out so juicy and delicious!  Next time I'll probably go the Low Sodium Dale's route just to ease up on the sodium content, but everything else was perfect.  Just be wary -- that freshly cracked black pepper can catch you off guard if you aren't careful!  Haha.  Otherwise this recipe is a perfect for summertime grilling and I can't wait to make it more during the season.  You should give it a shot too!


Ingredients [4 servings]

Directions

Place the bone-in pork chops in a large gallon-size resealable bag.


In a small bowl, combine together the Dale's Seasoning, garlic, and black pepper.  Pour the mixture into the gallon-size bag and make sure the pork chops are thoroughly coated.  Refrigerate for at least two hours.


Preheat your grill to around medium heat.  Place the pork chops on the grill and cook for about 4 minutes, or until juices start to pool on top of the chops.  Then flip and cook for another 3 minutes.


Allow to rest for about three to five minutes.  Then serve with your favorite vegetable and starch and enjoy!


Follow

Wednesday, July 22, 2015

Hawaii Volcanoes National Park Driving Tour: Lua Manu Crater


The Need to Knows:
  • The Lua Manu Crater is located along Chain of Craters Road in Hawaii Volcanoes National Park in Pahoa, HI.  Its exact location can be found here:
  • Since this stop is literally just a pull-off of Chain of Craters Road, I would classify it as wheelchair and stroller-friendly, haha.  No walking necessary to see this crater!
  • There are no restroom facilities nor water at this stop.
  • I would plan to spend 5-10 minutes here checking out the crater.
  • As always, for updated information on closures within the park, visit this NPS page.  Also keep in mind that any information in these posts is subject to change any time by the National Park Service!

Monday, July 20, 2015

Hawaii Volcanoes National Park Driving Tour: Devastation Trail


The Need to Knows:
  • The Devastation Trail is located along Crater Rim Drive in Hawaii Volcanoes National Park in Pahoa, HI.  The exact location of the parking lot and trailhead can be found here:
  • The Devastation Trail is about a mile long round trip and should take approximately an hour to complete (we turned around at about the midway point and probably spent a half hour here).
  • This trail is paved and is considered wheelchair and stroller accessible.  Keep in mind that there are areas of this trail with a grade of greater than 8 percent.
  • After you break from the trees, there is no shade on this hike, so be sure to apply sunscreen and/or wear a hat.  It can definitely get hot here!
  • There are no restroom facilities or water fountains located here.
  • Please always stay on the designated paved path in order to preserve the surrounding environment and also do not climb the Pu'u Pua'i Cinder Cone seen from the trail!
  • As always, for updated information on closures within the park, visit this NPS page.  Also keep in mind that any information in these posts is subject to change any time by the National Park Service!

Friday, July 17, 2015

BBQ Country Style Ribs

Here's another updated recipe from June of 2011, i.e. my blog's "olden" days!  Hope you all enjoy it!

---

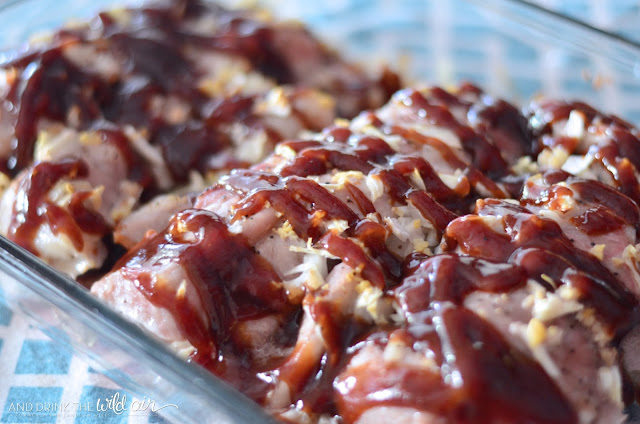
After a BOGO sale at my local grocery store for Country Style Ribs, I went searching for an appropriate barbeque recipe to add to my arsenal.  I came across this recipe at Allrecipes.com and decided to give it a whirl.

Adapted from Allrecipes


Ingredients [6-8 servings]
  • 2-3 pounds country style pork ribs
  • 1 tbsp garlic, minced
  • 1 medium onion, diced
  • 1 18 ounce bottle BBQ sauce
  • Salt and pepper to taste

Directions

Preheat oven to 250 degrees.  In a baking dish, place the ribs in a single layer.


Salt and pepper each rib as much as you'd like.  Then spread the garlic and onions on and around the ribs.


Bake in a preheated oven for 2 hours until the ribs are tender.  Then drain any grease in the pan.


Pour BBQ sauce over the ribs (I usually do half of the bottle here and add more if desired after cooking).  Return to oven and bake for one more hour.


Serve with your favorite side dishes and enjoy!


Are you a fan of country style ribs?


Follow

Wednesday, July 15, 2015

Hawaii Volcanoes National Park Driving Tour: Thurston Lava Tube


The Need to Knows:
  • The Thurston Lava Tube is located within Hawaii Volcanoes National Park along Crater Rim Drive in Volcano, HI.  Its exact location can be found here:
  • The trail takes about 20-30 minutes and is about 1/3 of a mile long.
  • Bathrooms and a water fountain are located here along the path.
  • Since there are steps and steep descents involved along the path, I wouldn't recommend this area as wheelchair or stroller-friendly, but it's definitely kid-friendly.
  • If the parking lot here is full, go back to the Kilauea Iki Overlook parking lot and park there.  It's about a half mile walk from that parking lot to the Thurston Lava Tube.
  • As always, for updated information on closures within the park, be sure to visit this NPS page here.  Also keep in mind that any information in these posts is subject to change any time by the National Park Service!

Monday, July 13, 2015

Hawaii Volcanoes National Park Driving Tour: Kilauea Iki Overlook


The Need to Knows:
  • The Kilauea Iki Overlook (which is also the Kilauea Iki Trailhead) is located within Hawaii Volcanoes National Park along Crater Rim Drive in Volcano, HI.  Its exact location can be found here:
  • There is no cost to visit this stop other than the park entrance fee.
  • There are no restroom facilities or water fountains located here.
  • This overlook also serves as the trailhead for the Kilauea Iki Hike.  Fore more information on this hike, check out the National Park Service's page on it here.
  • This overlook is wheelchair and stroller friendly (the parking lot is right next to the railings so very minimal walking is involved), but the accompanying hike here is definitely not.
  • Keep this parking lot in mind if the Thurston Lava Tube parking lot down the road is full since this lot is a bit bigger!
  • I would plan to spend about 10-15 minutes here soaking up the view.
  • As always, for updated information on closures within the park, be sure to visit this NPS page here.  Also keep in mind that any information in these posts is subject to change any time by the National Park Service!

Friday, July 10, 2015

Chocolate Banana Pudding

It's no secret that my family and I are huge fans of banana pudding.  I remember my grandmother making it during my childhood years (from scratch -- no box mixes here!), and then when I reached adulthood, I took over making it for family occasions and holidays.  I've already shared with you my grandma's original banana pudding recipe (man, I need to update those pictures!), but for today, I decided to twist it up a little bit!

Mr. L's favorite dessert is chocolate.  He loves chocolate anything.  His birthday cakes are always double chocolate -- chocolate cake with chocolate icing.  Needless to say, he is slightly obsessed!  So when I suggested to him the idea of a chocolate banana pudding, the "yes"es would not stop falling out of his mouth!

I kept the homemade part of my grandma's recipe and made the chocolate pudding from scratch.  I replaced the Nilla wafers with chocolate graham crackers and, of course, kept the bananas just like the original recipe.  And instead of meringue on top (since I didn't use egg yolks in the pudding mixture), I went with Cool Whip, an old standby.

It was cool, creamy, sweet, and delicious!  The chocolate punched up the banana flavor and was a great complement.  This recipe would be great for a party, a weekend, or just a yummy dessert after dinner.  Just make sure you have a crowd to feed it to.  Thankfully I can send ours to Mr. L's work and get it out of the house before I eat it all ;)  Give this recipe a try immediately -- you won't regret it!


Ingredients [6-8 servings]
  • 2/3 cup sugar
  • 1/4 cup cocoa
  • 3 tbsp cornstarch
  • 1/4 tsp salt
  • 2 1/4 cup milk
  • 2 tbsp butter
  • 1 tsp vanilla extract
  • 1 8oz tub Cool Whip
  • 4 to 6 medium bananas, sliced into 1-inch pieces
  • Half a box of chocolate graham crackers (or chocolate wafers if you can find them!)

Directions

In a medium-sized pot, combine the sugar, cocoa, cornstarch, and salt.  Gradually drizzle in the milk while stirring constantly until full incorporated.


Cook mixture over medium heat until it reaches, making sure to stir constantly as to not scald the milk.  Boil for one minute while still stirring.  Then remove from the heat and stir in butter and vanilla.


Press plastic wrap on top of pudding to prevent a skin from forming; set aside.


In a glass bowl, break apart graham cracker pieces and layer on the bottom of the bowl.  Add a layer of banana pieces on top and then pour half of the pudding mixture over the bananas.  Then add another layer of graham cracker pieces, then banana pieces, and finally the rest of the pudding.  Spread the Cool Whip on top of everything.


Chill for about two hours.  Then serve and enjoy!


Are you a chocolate lover like Mr. L?


Follow

Wednesday, July 8, 2015

Hawaii Volcanoes National Park Driving Tour: Jaggar Museum


The Need to Knows
  • The Jaggar Museum is located within Hawaii Volcanoes National Park along Crater Rim Drive in Volcano, HI on the Big Island.  Its exact location can be found here:
  • The museum is open daily from 10AM to 8PM.  The Halemaumau viewing platform is open 24/7.  Keep in mind that there is always a chance for closures due to volcanic gases.
  • It's also free to visit, although you still obviously have to pay to enter Hawaii Volcanoes National Park.
  • Restroom facilities and a water fountain are located here for public use.  A nice gift shop is also inside the museum for any souvenir shopping you'd like to accomplish!
  • I would expect to spend at least a half hour here enjoying the museum and the view of the crater.
  • For more information, check out the Jaggar Museum on the National Park Service's website.
  • And as always, for updated information on closures within the park, be sure to visit this NPS page here.  Also keep in mind that any information in these posts is subject to change any time by the National Park Service!

Monday, July 6, 2015

Hawaii Volcanoes National Park Driving Tour: Kilauea Overlook


The Need to Knows:
  • The Kilauea Overlook is located within Hawaii Volcanoes National Park along Crater Rim Drive in Volcano, HI.  Its exact location can be found here:
  • Since you've already paid to enter the park, it's obviously free to visit here :)
  • The walking path to the overlook is paved, so I would classify it as stroller and wheelchair friendly.  Just watch out for rocks or bumps!
  • There isn't any shade in this area, so make sure you're wearing sunscreen or a hat!
  • There also aren't any restrooms here nor is there water available.
  • I would expect to spend about 15 minutes or so here enjoying the view.
  • For updated information on closures within the park, be sure to visit this NPS page here.  Also keep in mind that any information in these posts is subject to change any time by the National Park Service!

Friday, July 3, 2015

Slow Cooker BBQ Pork Tenderloin

Here's one of my old recipes from way back when in June 2011 that I figured needed a little revamp!  It's still as delicious as it was back then, but now the pictures just look a little better ;)  Hope you enjoy this updated oldie but goodie!


---

After having pork tenderloins go on sale at my local grocery store a few times, I decided to use my mother's experiences and make some pulled pork out of it in the crock pot.  Mr. L absolutely loves this recipe, but be prepared -- if you have just two people like us, it makes a LOT of pork, so be prepared to use leftovers in creative ways!  :)


Ingredients [4-6 servings]
  • 1 boneless pork loin roast
  • 1 medium onion, chopped
  • 2 cloves garlic, minced
  • Salt and pepper to taste
  • 1 bottle of your favorite barbecue sauce (using around half to cook in the crock pot and the rest to add to the cooked meat later)
Directions


Place the pork loin in your slow cooker; salt and pepper, and then add the onions and garlic.


Set to low and cook for about five to six hours.  Drain juices from pot and add liberal amounts of barbecue sauce.  Let cook, still on low, for one more hour.


Then serve and enjoy!  :)

Follow

Wednesday, July 1, 2015

Hawaii Volcanoes National Park Driving Tour: Steam Vents and Steaming Bluff Overlook


The Need to Knows:
  • The Steam Vents and the Steaming Bluff Overlook are located within Hawaii Volcanoes National Park along Crater Rim Drive in Volcano, HI.  The parking lot can be found here:
  • Since you've already paid to enter the park, it's obviously free to visit here :)
  • I would classify this stop as stroller/wheelchair/kid friendly, but the path to the overlook is unpaved so it might be bumpy.  The trail to Sulphur Banks is wheelchair friendly, but it is advised not to go there if you have young children, are pregnant, or have heart or respiratory conditions.
  • There isn't any shade in this area, so make sure you're wearing sunscreen or a hat!
  • There also aren't any restrooms nor is there water available here.
  • The parking lot is a little on the small side, so if it's full when you come by, perhaps try to stop again when you double back after visiting the Jaggar Museum.
  • I would expect to spend about 15-20 minutes here checking out the overlook and definitely longer if you're going to see Sulphur Banks as well across the street.
  • For updated information on closures within the park, be sure to visit this NPS page here.  Also keep in mind that any information in these posts is subject to change any time by the National Park Service!

LinkWithin

Related Posts Plugin for WordPress, Blogger...

Adsense 2